

bronID’s Whitelabel Forms are a no-code and low-code identity verification solution that allows you to collect Know Your Customer (KYC) and Know Your Business (KYB) information through branded forms hosted by bronID. These forms streamline the process of verifying individuals and organisations by providing a ready-made interface that you can customise with your company’s branding. Instead of building your own verification forms from scratch, bronID’s Whitelabel Forms let you redirect users to a secure bronID URL (with your branding) to input their details. bronID then handles the identity verification in the background, and you receive the results in real-time.
Benefits of using bronID’s Whitelabel Forms include:
- Quick Deployment: No development is needed to start – you can get up and running quickly without writing code. This is ideal if you want to implement compliance checks as fast as possible.
- Branded User Experience: The forms are white-labelled. You can add your logo, colours, and company name so that the verification flow looks and feels like part of your platform, providing a seamless customer experience.
- Comprehensive KYC/KYB Coverage: bronID handles verification for individuals and various types of organisations in over 130 countries. This ensures you meet Anti-Money Laundering/Counter-Terrorism Financing (AML/CTF) requirements globally without integrating multiple services.
- No Need to Handle Sensitive Data Directly: Since users enter their personal or business details into bronID’s hosted form, sensitive data is submitted directly to bronID. This reduces your responsibility for securely collecting and transmitting identity data (especially if you don’t have an existing secure data capture process)
- Automated Updates: You receive verification status updates via webhooks and email notifications. This means your system can react in real time – for example, automatically moving a user to the next onboarding step when their identity is verified
- Scalability and Upgrade Path: You can start with simple form links and later upgrade to deeper integration (using bronID’s Forms API or full KYC API) as your needs grow
In this guide, we’ll walk through setting up your bronID Portal account and configuring your Whitelabel Forms, step by step. We’ll cover how to create and approve a test account (and understand the differences between bronID’s test and production environments), how to customise the forms with your branding, and how to generate verification form links for both individuals and businesses. We’ll then show how to embed these forms into your website or app, and how to integrate bronID’s API for generating forms programmatically. You’ll learn how to handle the verification results (either by checking the Portal or via webhooks/APIs) and finally how to smoothly transition everything to production when you’re ready to go live. By the end of this guide, you should have a working Whitelabel Forms integration that can verify your customers’ identities, with all the pieces – from form setup to result handling – properly in place.
Step 1: Setting Up a bronID Portal Account
Before you can use bronID’s Whitelabel Forms, you need to have a bronID Portal account in both the Test Environment and (eventually) the Production Environment. bronID provides a dedicated test sandbox for development, which is separate from the live production system. It’s important to understand the differences:
- Test Environment (Sandbox): The test environment uses a separate Portal (accessible at https://preview.bronid.com/) where you can experiment and integrate without any cost. In this environment, you have unlimited free test verifications. However, it only accepts test data – you should not submit real personal or business data here, because the results are simulated based on pre-defined test scenarios. The test Portal allows you to ensure your integration works correctly and to see how different verification outcomes are returned. All test accounts must be approved by bronID’s team, which can take up to ~24 hours. Once approved, you can use the test Portal to configure your forms and perform as many test KYC/KYB submissions as needed during development.
- Production Environment: The production environment is the live bronID Portal (https://portal.bronid.com/) where real verifications take place. Unlike the test environment, here you’ll be dealing with actual customer data and potentially incurring costs per verification. You will need to subscribe to a plan or maintain a credit balance for pay-as-you-go usage. Signing up for a production account involves a stricter onboarding process: bronID, as an accredited Identity Services Provider, will perform due diligence on your organisation before granting access. You must provide accurate information about your business (legal name, business number, website, etc.) and use a valid work email – personal email domains (Gmail, Yahoo, etc.) are not allowed. bronID may even request additional documents or an onboarding call as part of the approval. This vetting ensures that only legitimate businesses with appropriate compliance requirements use the service.
How to sign up:
- Test Portal Sign-up: Go to https://preview.bronid.com/signup and fill out the sign-up form for a test account. Use a dedicated work email (for example, kyc-test@yourcompany.com) that you don’t mind being tied to test data. Provide all required company details (company name, registration number, country, etc.) accurately so that approval isn’t delayed. Once submitted, wait for bronID to approve your test account (they’ll email you upon approval). After approval, you can log into the preview portal and begin configuring your integration.
- Production Portal Sign-up: When you’re ready to go live (or even in parallel with testing), sign up on the production portal: https://portal.bronid.com/signup. The sign-up process is similar but expect that bronID will verify your information thoroughly. Double-check that all details (company legal name, regulatory licenses, etc.) are correct and complete. Using your official work email domain is mandatory. Provide any additional info requested by bronID’s team to satisfy their compliance checks. Once your production account is approved, you’ll have access to the full bronID Portal with live functionality.
Test vs Production Credentials: Note that your test account and production account are separate. You will receive different API keys for each environment, and data does not carry over. This separation ensures test activity doesn’t affect your live compliance records. During integration, you will generate test API keys and use test endpoints (which we’ll do in upcoming steps). Later, you’ll generate production API keys and swap the endpoints to go live. Always keep track of which keys and environment you’re using – test keys will only work on the preview (sandbox) endpoints, and production keys only on the live endpoints.
Step 2: Configuring Your Whitelabel Forms
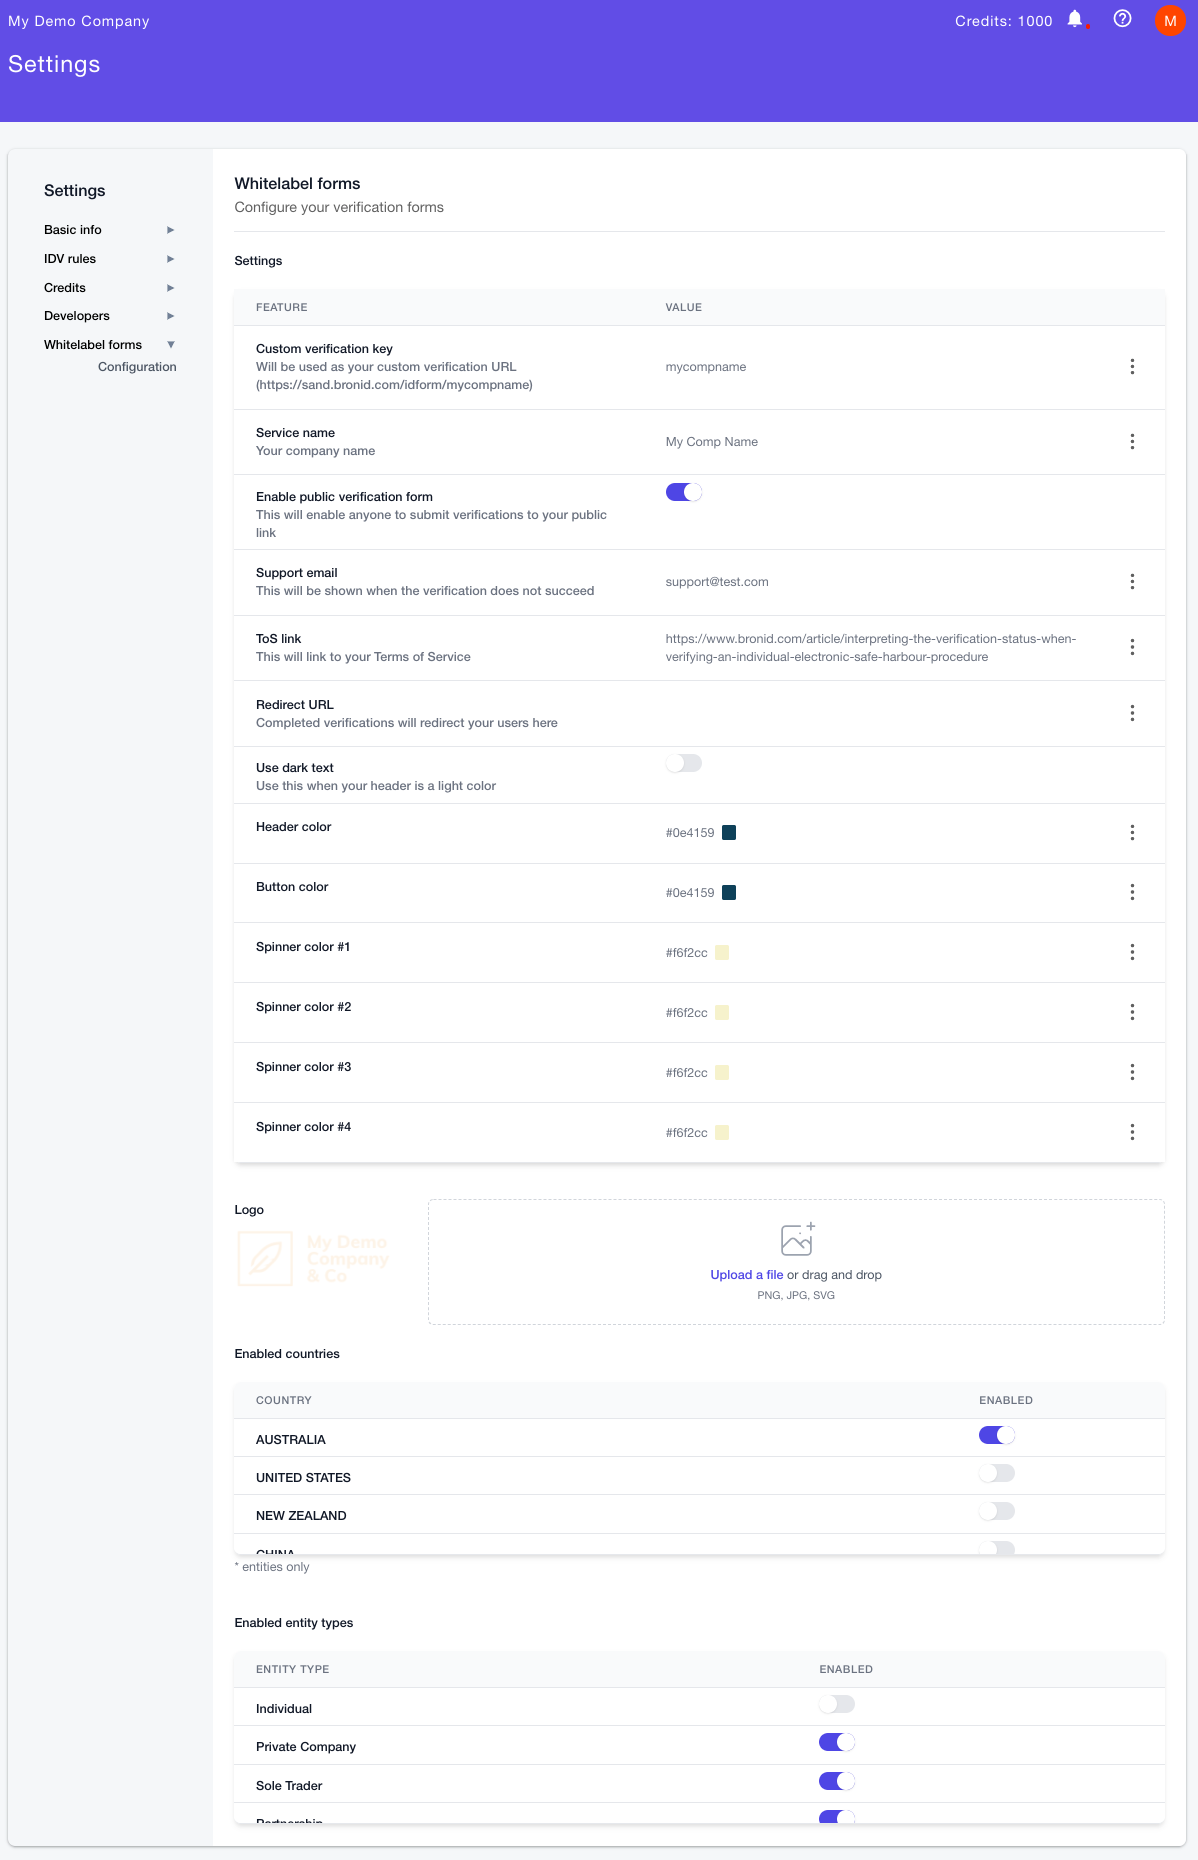
Once you have Portal access, configure the Whitelabel Forms to match your branding. You can add your logo, set colour schemes, define custom form URLs, and specify contact details. This ensures customers see your brand and the form behaves as required.
- Access Whitelabel Forms Settings: Log in to your bronID Portal and navigate to the Whitelabel forms configuration page.
- Custom Verification Key (Form URL): This unique key becomes part of the URL. For example, if your key is
mycompany, your form link might behttps://portal.bronid.com/idform/mycompany. This routes verification submissions to your account. - Service Name: Display name of your business or service that appears on the forms.
- Decide on Static vs. Unique Links: A static link can be used by anyone who has it. For security in production, many prefer to disable the static link and generate unique one-time links for each verification request.
- Branding Elements (Logo and Colours): Upload your logo and choose header, button, and spinner colours that match your brand. Make sure the text is readable against your chosen background.
- Support Contact Info: Provide a support email so users know whom to contact if there’s an issue. You can also link your Terms of Service (ToS).
- Optional Post-Verification Redirect: Send users to a specific URL after they submit the form (for example, a thank-you page).
- Enable Relevant Countries and Entity Types: Only allow the countries and entity types you plan to verify, making the form more focused and avoiding irrelevant fields.
- Save and Review: Test the static form link to confirm your branding, colours, and service name look correct. The URL should contain your custom key and show the updated design.
With Whitelabel Forms set up, you’re ready to create verification links for KYC (individual) or KYB (organisation) and send them to users.
Step 3: Generating a Whitelabel Form Link (via Portal or API)
You can generate form links either manually via the bronID Portal or programmatically via the API. This section explains how to do it in the Portal, which requires no coding.
bronID supports:
- Individual KYC Form for verifying personal identity.
- Organisation KYB Form for verifying businesses and other legal entities.
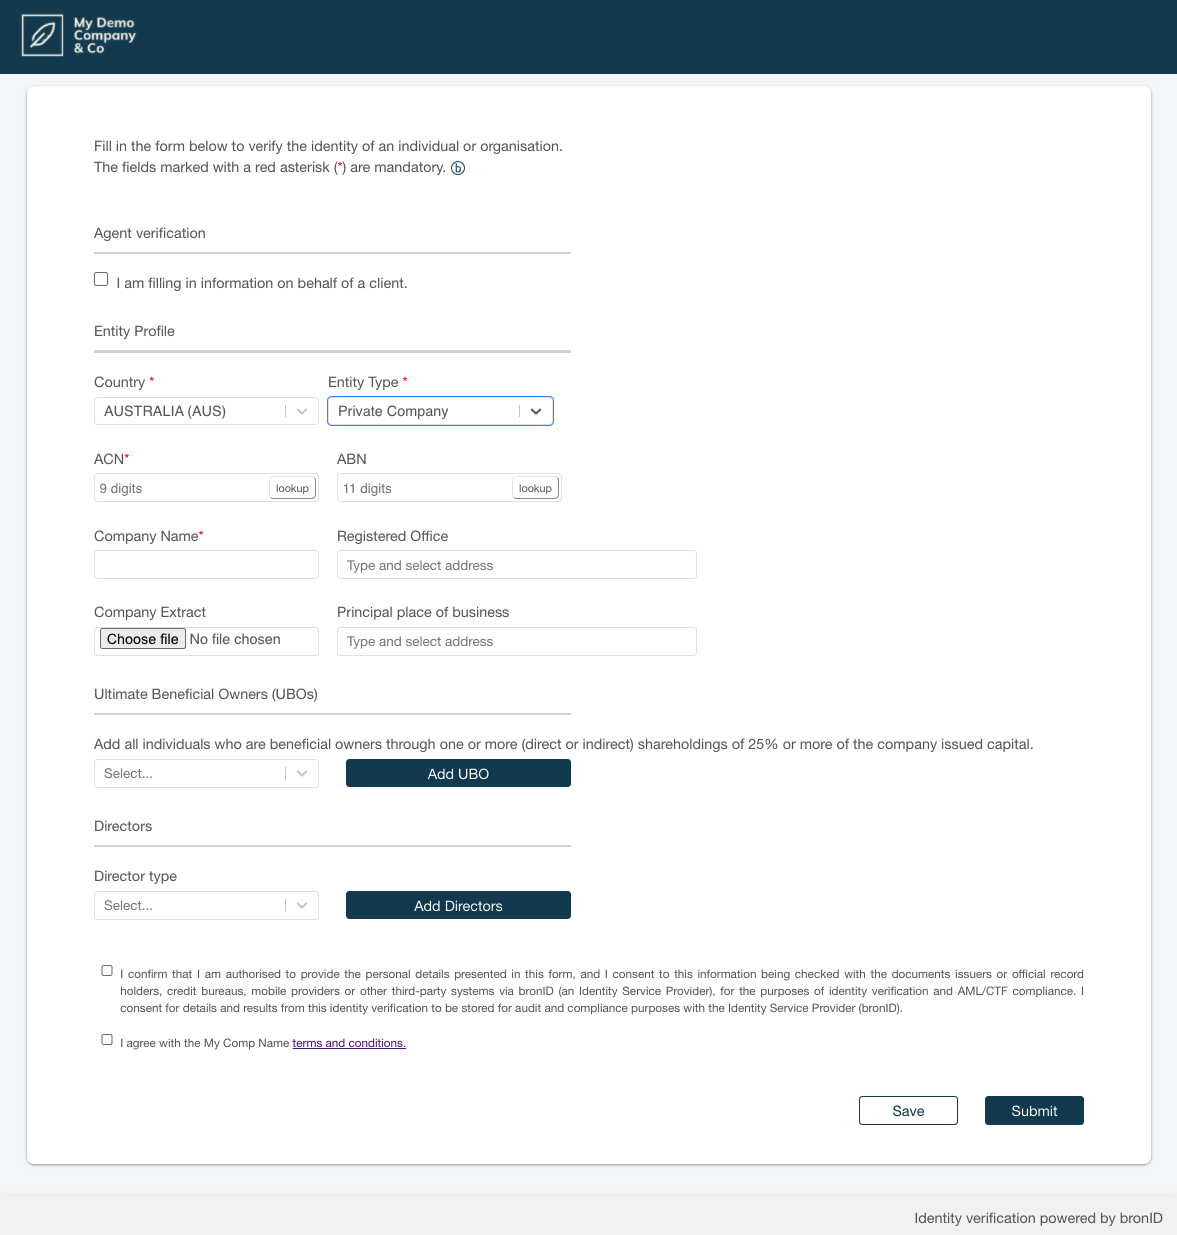
Step 3A: Generate a Whitelabel Form Link via the Portal
To generate a Whitelabel Form link via the Portal:
- Navigate to the Verification Section: Go to the KYC area in the bronID Portal.
- Select Individual or Organisation: Choose the appropriate option for the type of customer you want to verify.
- Choose Country and Entity Type: Ensure the form matches the user’s location or business details.
- Prefill Details (Optional): You can prefill known information (like name, email, company name) to save the user time.
- Generate the Form Link: Use the provided option (often in a menu or button labelled “Generate form”). A pop-up or window will appear.
- Unique User Identifier (optional): Provide a User ID or reference if you want to track the verification in your system.
- Confirm and Copy the Link: The Portal generates a unique URL. Copy it and share it with your customer or embed it in your app.
- Test the Link: Paste it into your browser to ensure it opens your branded form and that submission works. In the test environment, use dummy data that triggers various success or failure scenarios.
Each generated link is typically one-time use for a specific user. In test mode, submissions are free, so you can try multiple scenarios. You can create links for both individuals and organisations.

Step 3B: Generate a Whitelabel Form Link via the API
While the bronID Portal provides a convenient way to manually generate Whitelabel Form links, most production scenarios will benefit from using the API to do this automatically. bronID’s Forms API allows your system to create verification form links on demand (and even pre-fill them with known user data) without needing to log into the Portal each time. This integration turns the process into a seamless part of your app’s back-end workflow.
Using the Forms API, you can perform the following programmatically:
- Generate a KYC/KYB form link for a given user or customer, specifying their details (name, DOB, etc.) to pre-fill.
- Optionally send that link to the user (via email, SMS) or immediately redirect the user to it from your app.
- Receive the verification results via webhook, and query status via API if needed.
Before you use the Forms API, ensure you generate your API credentials from the Portal:
- A Service UID (Unique Identifier) for your service (found under Settings > Developers > API Keys in the Portal).
- A Secret API Key (you can generate one in the same section).
These will be included in your API requests for authentication.
Generating a Whitelabel Form via API:
bronID’s API has an endpoint for creating a form link. Use the top left dropdown in the documentation to change different entity types. When you make a POST request to this endpoint with the required data, it will return a unique form link that you can use.
Here’s a high-level example of how to call the Forms API for an individual KYC form:
- HTTP Method: POST
- Endpoint (Test): (Use the appropriate bronID test endpoint)
- Request Body: a JSON object containing:
- Your credentials and metadata:
- metadata_serviceUid: your Service UID from the Portal
- metadata_secretKey: your Secret API Key
- metadata_version: API version (currently “4” as of writing)
- metadata_userId: a unique ID for the user in your system (optional but useful for tracking).
- bronLink_dataAccessType: set to "idForm" (this tells bronID you want an ID form link back).
- type: the type of verification, e.g. "individual" or "organisation" (and if organisation, possibly specify subtype like company, trust, etc.).
- fields: an object with the fields required for that type. For example, for an individual you might include:
- country: 3-letter country code (e.g., "AUS")
- firstName, middleName, lastName
- dateOfBirth (format DD/MM/YYYY)
- address
- Your credentials and metadata:
1const apiEndpoint = 'https://dev.bronid.com/idform';
2
3// request body
4const kycData = {
5	"metadata_serviceUid": "XL7ULiU6B4QE9Y2iWFZnhtMDKFN2",
6	"metadata_secretKey": "api_sec_NJAtNcRtUrPlf7xYDrMNP9URI-ZfN314",
7	"metadata_version": "4",
8	"metadata_userId": "yourUniqueUserId",
9
10	"bronLink_dataAccessType": "idForm",
11
12	"type": "individual",
13	"fields": {
14		"country": "AUS",
15		"firstName": "Jane",
16		"middleName": "ok",
17		"lastName": "Citizen",
18		"gender": "female",
19		"dateOfBirth": "20/10/1980",
20		"address": "125 york st",
21		"email": "email@gmail.com"
22	}
23}
When the API call is successful, you’ll get a JSON response containing a field called bronLink. This is the URL of the newly generated form. For example, the response might look like:
1{ "source": "bronid", "bronLink": "<example form URL>", "verificationUuid": "5ae132d1-a4f6-4e72-adf4-92aa4faa39a3", "status": "success"}
The bronLink is a unique URL that you can send to the user (notice it contains a UUID – each request creates a distinct link). If you included field data in your request, the form that the user sees will already have those fields filled in, which improves user experience and reduces data entry. The response also includes a verificationUuid, which is an ID for that verification attempt – you can store that if you want to later query the status via API. The status: "success" just means the link was generated successfully.
Important considerations for form links generated via API:
- The link is time-limited and usage-limited. A generated form link is valid for 30 days, can be opened up to 10 times (if not “saved”), and can be used to attempt verification up to 5 times. If a user fails verification and you want to let them try again after 5 attempts or after expiration, you’d need to unlock the link which can be done via the API or the Portal.
- The user can partially fill the form and choose to save it (if they don’t finish in one go). In such cases, the link will become “locked and saved” for that session and the user can unlock it with a code they will receive to their email. You can also unlock the link via the bronID Portal if needed.
Using the API in practice:
- If your flow is web-based, you might call your back-end API when the user reaches the verification step. Your back end then calls the bronID’s endpoint with the user’s info and your keys, gets the bronLink, and you can then redirect the customer to this link.
- Alternatively, you might email or text the link to the user if the verification is to be done off-session.
- Reset the the Form session. As link expire after 30 days, generally it is advisable that you unlock and refresh the Form link every time the user tries to access it via your platform.
Step 4: Handling Verification Results
After a user submits their form, bronID processes the verification. You’ll need to track the outcome—either by checking the Portal or by using webhooks for real-time notifications. Your system can then respond accordingly (e.g., mark a user as verified or prompt for more information).
Monitoring in the bronID Portal
You can log in and view the status of each verification submission. This is useful for manual oversight and testing.
Setting Up Webhooks
Webhooks are the most efficient method for staying updated:
- Register a webhook URL in your bronID Portal settings.
- When verification status changes (e.g., verified, rejected, or info required), bronID sends an HTTP POST with details to your endpoint.
- Implement a handler in your application that processes these notifications, updates user records, and triggers any follow-up actions.
You can also set up a signing key to verify that incoming requests are genuinely from bronID. This prevents spoofed verification statuses.
Interpreting Verification Results
The verification statuses that you will receive include:
- Pending: The user has submitted but processing isn’t finished yet.
- Verified: The individual or organisation has been verified in accordance with the IDV Rules. You can grant access or proceed with onboarding.
- Rejected: The verification failed. Reasons might include data mismatches or invalid documents. You can allow the user to try again or deny service if appropriate.
- Info (Needs More Info): Additional details are required (e.g., a document upload, verification of a company’s shareholders). The user may need to complete extra steps or forms (refer to the section below for Resolving "Info" Requests).
Retrieving Verification Status via API
After the user submits the form, you will primarily rely on webhooks for real-time status. However, bronID also provides an API endpoint to fetch the latest verification status of a given entry. This is useful if you want to poll for status or double-check the result at any point. The endpoint might be something that lets you query by the userId you provided or a trace ID (verification UUID). The response will tell you if that user’s verification is pending, verified, rejected, etc., along with details. Typically, you’d use this if your webhook was missed or to build a status dashboard in your app. Most of the time, though, you won’t need to manually poll this if you handle webhooks properly – the webhook will notify you as soon as status changes.
Resolving "Info" Requests in KYB Verifications
When a KYB verification shows an Info status, it means bronID requires more information before it can complete its checks. Typically, extra data is needed for certain stakeholders (e.g., directors, UBOs) or additional documents (like trust deeds or certificates of incorporation).
Resolving "Info" via the Portal
- Locate the Entry: In the bronID Portal, find the organisation with an Info status.
- Check Required Actions: In the right slider open the “Required Action” tab to see what items must be supplied.
- Complete Each Action: This may involve verifying individuals linked to the business or uploading documents. Provide all necessary data and files.
- Await Updates: Once you’ve submitted the requested info, bronID continues processing. You’ll receive an update when the verification progresses to Verified or another outcome.
Handling "Info" via the API
When a KYB verification reaches Info status, bronID issues a webhook to your application indicating that additional details are required (for instance, documents or stakeholder information). Your integration must:
- Receive the "Info" Webhook
- Set up a POST endpoint in your server to handle bronID’s webhook calls.
- Examine the payload for a
verificationStatusof"info". - Identify which information is requested (it might be extra individual KYC checks, missing documents, or both).
- Collect the Required Details
- If an individual’s KYC is needed (e.g., a director or UBO), gather their full details (name, DOB, address, etc.).
- If a document is required (e.g., a trust deed), obtain or generate a clear digital copy in PDF, JPEG or PNG format, no larger than 25 MB.
- Ensure you have the relevant IDs from the webhook (e.g.,
verificationUuidand any internal references for people or documents).
- Send a Follow-Up Request to the bronID API
- Construct a request body that includes the original
verificationUuidand your newly gathered data. - Provide the stakeholder details and/or attach documents in Base64 encoding.
- Include your bronID credentials (such as Service UID and secret key) either in the request body or headers, according to your chosen authentication approach.
- Construct a request body that includes the original
- Monitor Status Changes
- Once you submit the follow-up data, bronID continues processing.
- Listen for subsequent webhooks or check verification status to see if it moves from Info to Verified, or if more actions are requested.
Here is the example of the info webhook:
1{
2	"verificationStatus": "info",
3	"entityType": "privateCompany",
4    "name": "THE ENTITY NAME",
5	/* the verificationUuid which has missing information */
6	"verificationUuid": "63152524-c722-4a44-8931-1c6caad4dbcf",
7    "trace": "63152524-c722-4a44-8931-1c6caad4dbcf",
8	"timestamp": 1583455152245,
9	"userId": "theSubmittedUserId",
10	"idvRiskScore": {
11		"description": "Medium",
12	},
13	/* these are the requestedActions */
14	"requestedActions": [
15		{
16			"type": "individual",
17			"role": "trustee",
18			/* the missing stakeholder id */
19			"id": "5ad6b33c-44f1-4b12-9ec9-31fadd41f6c3",
20			"fields": {
21				/* information about the missing stakeholder */
22				"country": "AUS",
23				"firstName": "Jane",
24				"lastName": "Citizen",
25				"middleName": ""
26			}
27		},
28		{
29			"type": "document",
30			/* the missing document id */
31			"id": "a2820913-8be8-4cd9-bacc-29b6cfd2d38c",
32            /* the name of the requested document */
33			"extractType": "Trust Deed for My Entity"
34		}
35	]
36}
You can submit the information for the requestedActions with a follow-up request:
{
	"metadata_version": "4",
	"metadata_serviceUid": "yourServiceUid",
	"metadata_secretKey": "yourSecretKey",
	/* this matches the verificationUuid of the info verification */
	"verificationUuid": "cd0c518f-7084-49ff-802a-9c517245daf2",
	/* these are the requestedActions */
	"requestedActions": [
		{
			"type": "individual",
			"role": "trustee",
			/* this matches the id of the requested stakeholder */
			"id": "5ad6b33c-44f1-4b12-9ec9-31fadd41f6c3",
			"fields": {
				"country": "AUS",
				"firstName": "Jane",
				"lastName": "Citizen",
				"middleName": "",
				"gender": "female",
				"dateOfBirth": "20/10/1982",
				"unitNumber": "1",
				"streetNumber": "94",
				"streetName": "lennox",
				"streetType": "Street",
				"suburb": "CASINO",
				"postcode": "2470",
				"state": "NSW",
				"email": "email@domain.com"
			}
		},
		{
			"type": "document",
			/* this matches the id of the requested document */
			"id": "a2820913-8be8-4cd9-bacc-29b6cfd2d38c",
			/* the base64 of the document */
			"documentBase64": "data:image/png;base64,iVBORw0KGgoAAAANSUhEUgAAAAUAAAAFCAYAAACNbyblAAAAHElEQVQI12P4//8/w38GIAXDIBKE0DHxgljNBAAO9TXL0Y4OHwAAAABJRU5ErkJggg==",
		}
	]
}
Step 7: Moving to Production
Once you’ve tested thoroughly in the sandbox, you can move to live production.
- Obtain Production Credentials: Generate new API keys in your production account. Keep them secure.
- Update API Endpoints: Switch from the test URLs to the live URLs in your code and configurations.
- Set Up Production Webhooks: Add your webhook URL to your production Portal settings and implement verification of the signing key if needed.
- Reapply Branding Settings: Upload your logo, define colours, and configure form preferences in production as you did in test.
- Disable Static Link (If Desired): Enforce unique, one-time links for greater security.
- Check Credit Balance or Subscription: Ensure you have sufficient credits or an active plan so live verifications can proceed.
- Run a Final Production Test: Perform a verification with real data to confirm everything is working.
- Security & Compliance Review: Store API keys securely, limit Portal access, and update your privacy policy or user agreement as required.
- Go Live & Monitor: Launch your updated code, watch logs, check webhooks, and be ready to assist users if any issues arise.


